본 예제 프로그램은 Pixoneer.NXDL.NNCW의 XncwObserver, XncwTheater를 이용하여 NCW 시뮬레이션을 위한 환경을 구성하고, Pixoneer.NXDL.NEQUIP의 XAircraft클래스를 이용하여 시뮬레이션 대상을 NCW(Network Centric Warfare)환경을 구현해 보도록 합니다.
3D 모델과 시뮬레이션을 위한 데이터 파일을 이용해 XAircraft를 추가하여 2D/3D Planet View에서 도시하고, 2D PlanetView에서 마우스 더블클릭으로 XAircraft를 선택하면 시뮬레이션 비행체의 도시 속성 및 카메라 모드를 설정하여 시뮬레이션 관측 모드를 변경할 수 있도록 합니다.
들어가기 전에
설치 프로그램으로 배포되는 XDL 엔진은 Visual Studio 2022 x64 Release 버전으로, Visual Studio 2022 이상의 버전에서 사용 가능하다.
아래의 설명은 Visual Studio 2022를 기준으로 하겠다.
새로운 Form을 추가하려면, Visual Studio의 메뉴 [프로젝트]-[양식 추가(Windows Forms)]를 선택하거나, [솔루션 탐색기]에서 프로젝트를 선택한 후 마우스 오른쪽 버튼을 클릭하여 생성되는 메뉴에서 [추가]-[양식(Windows Forms)]을 선택한다.
비행체 추가를 위한 Form의 이름은 “AddPlaneForm.cs”로 한다.
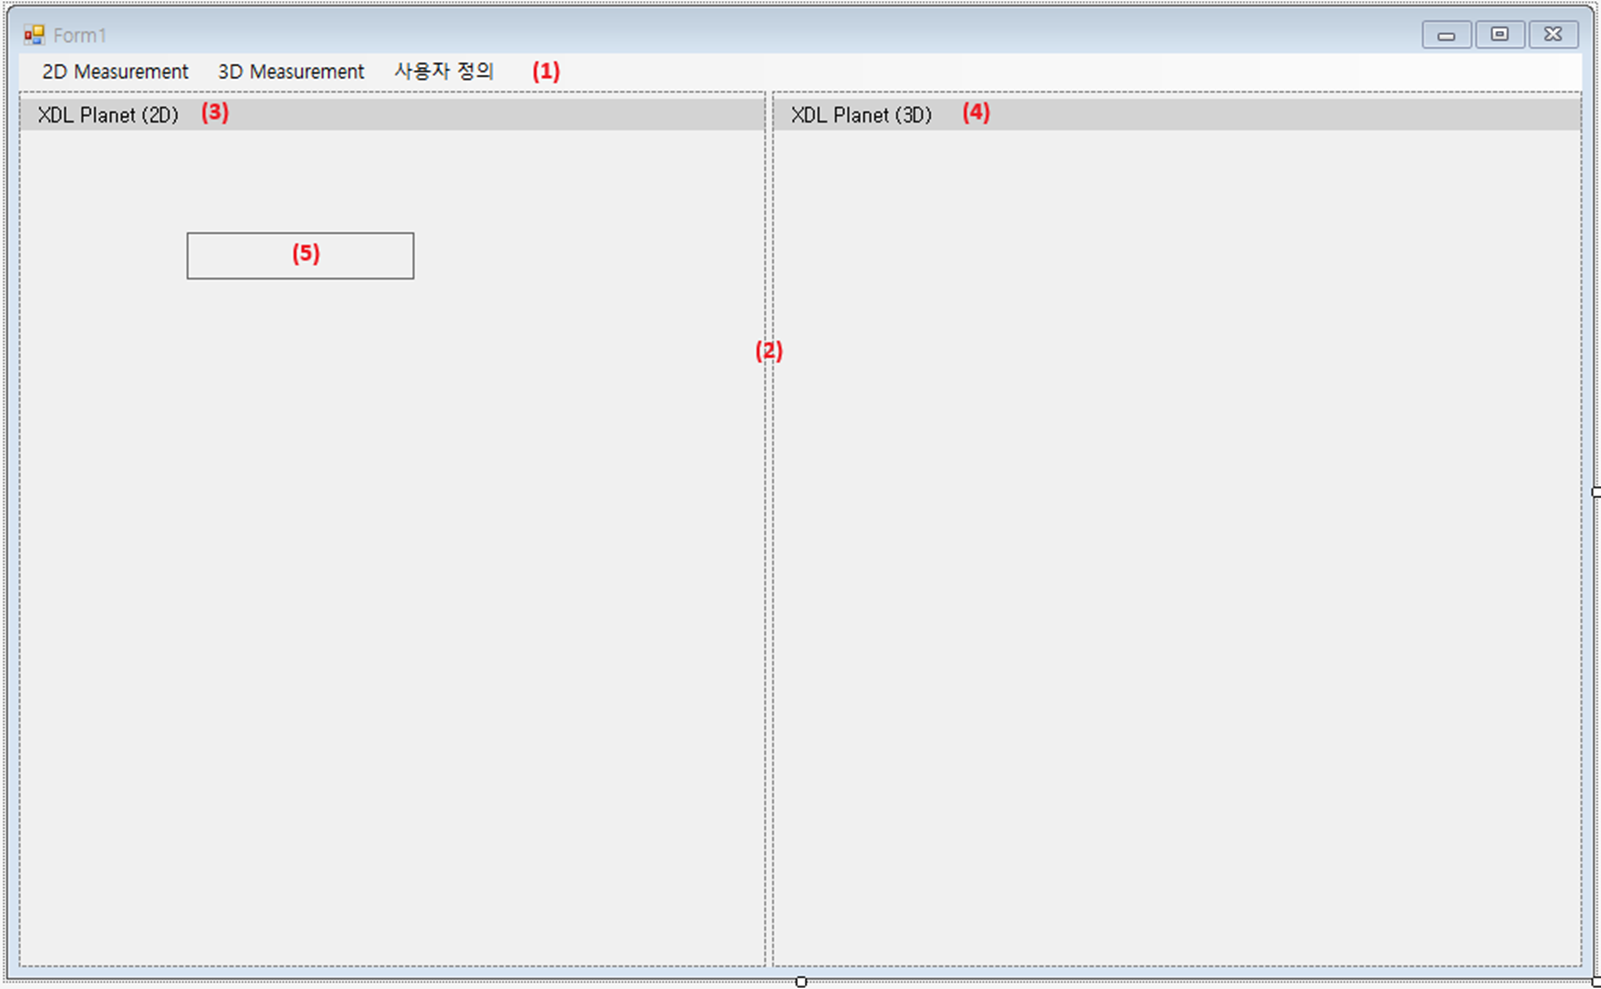
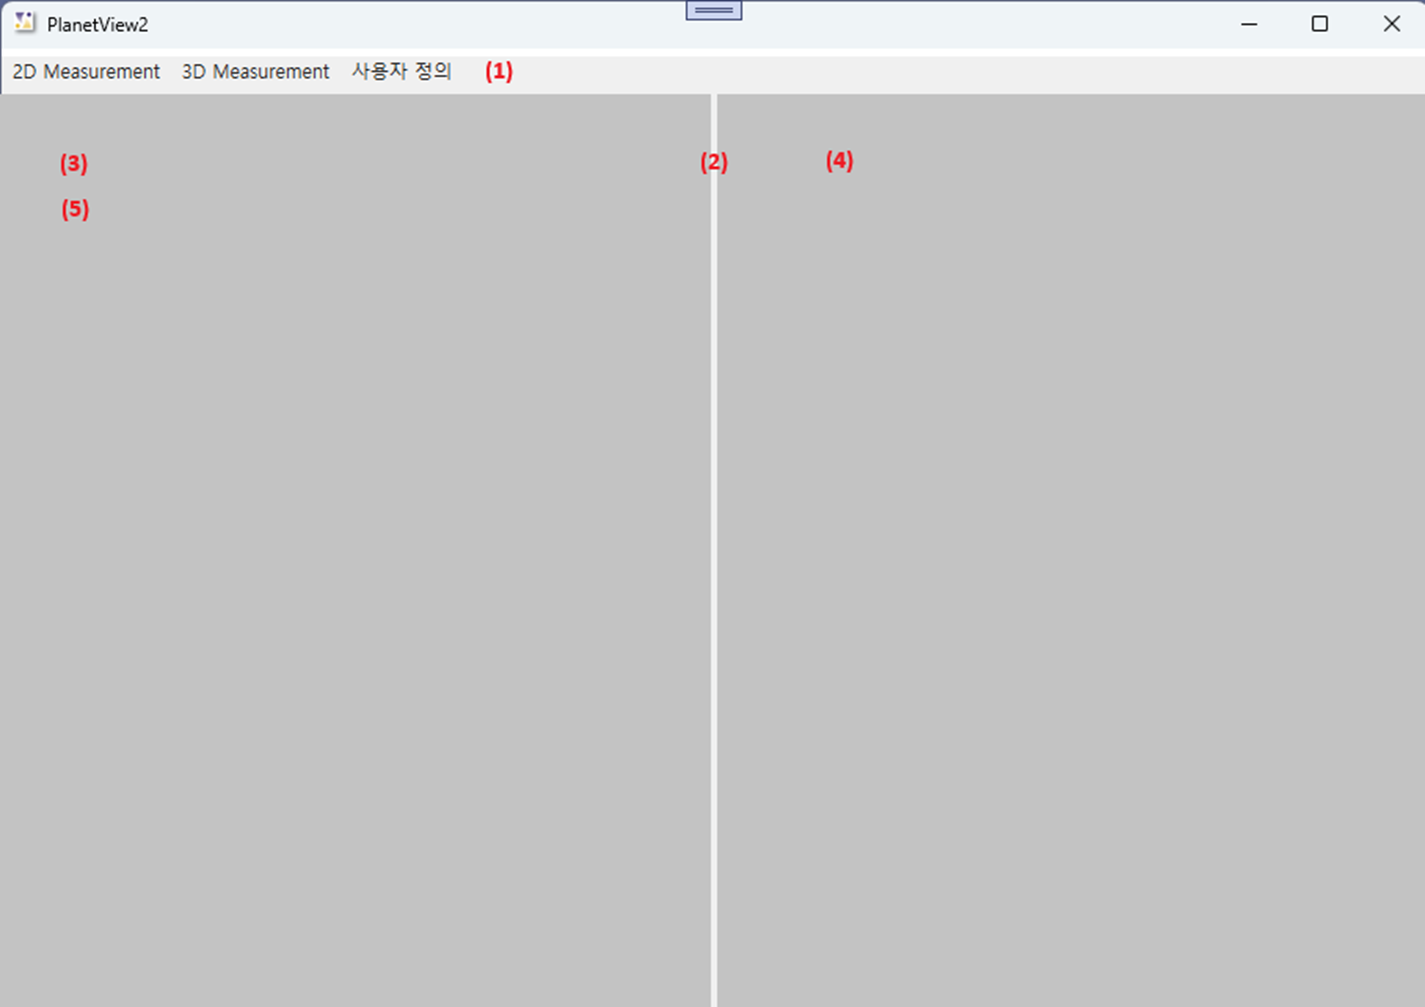
AddPlaneForm의 디자인은 아래와 같다.
번호
Name
Control Type
비고
(1)
textBoxID
TextBox
(2)
textBoxName
TextBox
(3)
textBoxPathModel
TextBox
(4)
buttonLoadModel
Button
(5)
textBoxPathData
TextBox
(6)
buttonLoadData
Button
(7)
buttonOK
Button
DialogResult : OK
(8)
buttonCancel
Button
DialogResult : Cancel
buttonOK와 buttonCancel은 Form의 DialogResult를 각각 OK와 Cancel로 설정한다.
2.3 비행체의 도시 속성 및 카메라 모드를 설정하는 Form을 솔루션에 추가하고 디자인한다.
XDL_PlanetView4에 “PlaneProperty.cs”라는 파일이름으로 Windows Form을 추가한다. PlaneProperty Form의 디자인은 아래와 같다.
번호
Name
Control Type
비고
(1)
textBoxID
TextBox
ReadOnly : True
(2)
textBoxName
TextBox
(3)
textBoxScaleX
TextBox
(4)
textBoxScaleY
TextBox
(5)
textBoxScaleZ
TextBox
(6)
checkBoxScalable
CheckBox
(7)
comboBoxCameraMode
ComboBox
(8)
checkBoxShowBoundingBox
CheckBox
(9)
buttonOK
Button
DialogResult : OK
(10)
buttonCancel
Button
DialogResult : Cancel
comboBoxCameraMode는 Pixoneer.NXDL.NNCW.XncwObserver.eViewMode를 선택할 수 있도록 항목을 편집한다. 항목으로는 순서대로 “Back View”, “Front View”, “Left View”, “Right View”, “God’s eye View”, “God’s eye View Static”, “Bottom View”, “Bottom View Static”, “Inside View”,
“Inside View free”, “Far View”, “Unusable”을 추가하도록 한다.
3 기능 및 이벤트 추가
3.1 Form1에 NCW를 위한 변수를 추가하고 Form1의 생성자에서 초기화한다.
NCW 환경을 위한 레이어는 Pixoneer.NXDL.NNCW.XncwTheater xncwTheater 변수로 하고, Planet 2D와 3D에서 시뮬레이션 주시를 위한 레이어는 각각 Pixoneer.NXDL.NNCW.XncwObserver의 xncwObserver2D, xncwObserver3D로 하겠다. 코드는 아래와 같다.
C#
                                using Pixoneer.NXDL;             // 기본 함수 관련 기능
using Pixoneer.NXDL.NXPlanet;    // 구 기반 도시 관련 기능
using Pixoneer.NXDL.NNCW;        // NCW 환경 관련 기능
using Pixoneer.NXDL.NEQUIP;      // NCW 환겨에서 시뮬레이션하는 모델 관련 기능

namespace XDL_PlanetView4
{
    public partial class Form1 : Form
    {
        private XncwTheater xncwTheater;       // ncw 환경을 위한 레이어
        private XncwObserver xncwObserver2D;   // 2D Planet에서 시뮬레이션 모델 주시 기능을 담당할 레이어
        private XncwObserver xncwObserver3D;   // 3D Planet에서 시뮬레이션 모델 주시 기능을 담당할 레이어

        public Form1()
        {
            InitializeComponent();

            // PlanetView 2D/3D의 배경색 설정
            nxPlanetView2D.BackColor = Color.Black;
            nxPlanetView3D.BackColor = Color.Black;

            // NCW를 위한 theater 객체, observer 객체 생성
            xncwTheater = new XncwTheater();
            xncwObserver2D = new XncwObserver();
            xncwObserver3D = new XncwObserver();
        }
    }
}
3.2 Form1을 선택하고 Form1을 선택하고 [속성] 창 - [이벤트]메뉴를 선택한 뒤 “Load” 이벤트와 “Closed” 이벤트를 더블 클릭한다.
Form1_Load 함수에는 xncwTheater와 xncwObserver2D, xncwObserver3D를 nxPlanetView2D와 nxPlanetView3D에 추가하고 각 view의 카메라 초기값을 설정한다.
C#
                                private void Form1_Loaded(object sender, EventArgs e)
{
    // Theater 객체를 Planet 2D/3D 뷰에 추가
    xncwTheater.AttachTo(nxPlanetView2D);
    xncwTheater.AttachTo(nxPlanetView3D);

    // Theater의 모든 객체를 PlanetView 3D에서는 항상 주시할 수 있도록 설정
    xncwTheater.ShowAllObjects(nxPlanetView3D, true);

    // 각 PlanetView에 관찰을 위한 Observer 객체를 각각 추가한다.
    xncwObserver2D.AttachTo(nxPlanetView2D);
    xncwObserver3D.AttachTo(nxPlanetView3D);

    XGeoPoint gpEye = XGeoPoint.FromDegree(127.4, 38.0, 1500000);
    // Planet2D 모드의 camera 위치 설정
    nxPlanetView2D.SetCameraPosition(gpEye, XAngle.FromDegree(0.0));
    // Planet3D 모드의 camera 위치 설정
    nxPlanetView3D.SetCameraPosition(gpEye, XAngle.FromDegree(0.0), XAngle.FromDegree(-90.0), XAngle.FromDegree(0.0));
}

private void Form1_FormClosed(object sender, FormClosedEventArgs e)
{
    Xfn.Close();
}
3.3 시뮬레이션 대상인 모델을 구현하기 위해서 프로젝트에 새로운 클래스를 추가한다.
시뮬레이션 대상의 모델은 MyPlane으로 하고 이를 프로젝트에 추가한다. Visual Studio 2022의 메뉴 [프로젝트]-[새 항목 추가] 또는 [솔루션 탐색기]에서 “XDL_PlanetView4” 프로젝트를 선택한 후 마우스 오른쪽 버튼을 클릭하여 생기는 메뉴 중 [추가]-[새 항목]을 선택한다. “새 항목
추가” 대화상자에서 “클래스”를 선택한 후 이름을 “MyPlane.cs”로 하고 “추가” 버튼을 클릭한다.
MyPlane은 시뮬레이션을 위한 모델파일을 로딩하여 파일에 저장되어 있는 시뮬레이션 데이터를 100 milli second마다 읽어 위치와 자세를 설정하도록 한다. 이를 위해서 System.Threading 관련 기능과 System.IO 관련 기능을 사용한다. MyPlane 클래스 구현은 아래와 같다.
C#
                                using System;
using System.Collections.Generic;
using System.Linq;
using System.Text;

using System.IO;        // FileStream 관련 기능
using System.Threading; // Threading 관련 기능

using Pixoneer.NXDL;                // 기본 함수 관련 기능
using Pixoneer.NXDL.NNCW;           // NCW 환경 관련 기능
using Pixoneer.NXDL.NEQUIP;         // NCW 환경에서 시뮬레이션하는 모델 관련 기능

namespace XDL_PlanetView4
{
    class MyPlane : XAircraft
    {
        public string  modelPathData;  // 시뮬레이션 데이터 파일 경로
        public string modelPathModel; // 모델 파일 경로
        public string modelName;      // 모델 이름
        public int modelID;             // 모델 구별자

        // 시뮬레이션 주시(관측) 모드
        public XncwObserver.eViewMode cameraMode;
        // 모델의 경계 영역 도시 여부
        public bool modelShowBoundingBox;

        private FileStream modelFileData;   // 시뮬레이션 데이터 파일
        private Thread modelThread;         // 시뮬레이션을 위한 쓰레드
        private bool runThread;             // 시뮬레이션 쓰레드 여부 설정

        // 클래스 생성자
        public MyPlane()
        {
            modelPathData = "";
            modelPathModel = "";
            modelName = "MyPlane";
            modelID = 0;

            // Camera 관측 모드
            // Unuable인 경우 특정 모델을 주시하지 않을 때 사용
            cameraMode = XncwObserver.eViewMode.Unusable;
            modelShowBoundingBox = false;
            modelFileData = null;
            modelThread = null;
            runThread = false;
        }

        // 모델 경로, 시뮬레이션 데이터 경로, 이름 및 ID를 입력으로 받아 초기화하는 함수
        public bool Initialize(string pathModel, string pathData, string name, int nID)
        {
            // 파일 경로로부터 모델 데이터 로딩
            if (!LoadModel(pathModel)) return false;

            // 멤버 변수 설정
            modelName = name;
            modelID = nID;
            modelPathData = pathData;

            // 시뮬레이션 데이터 로딩
            modelFileData = new FileStream(modelPathData, FileMode.Open, FileAccess.Read);
            return true;
        }

        // 시뮬레이션 기능 및 데이터를 해제하는 함수
        public void Uninitialize()
        {
            // 쓰레드가 있는 경우 이를 해제
            if (modelThread != null)
            {
                runThread = false;
                if (modelThread.IsAlive)
                    modelThread.Join();
                modelThread = null;
            }

            // 시뮬레이션 데이터가 있는 경우 이를 해제
            if (modelFileData != null) modelFileData.Close();
        }

        // 시뮬레이션 함수
        public void SimulationThread()
        {
            // 시뮬레이션 데이터가 없는 경우 진행하지 않는다.
            if (modelFileData == null) return;

            // 시뮬레이션 실행 여부를 실행하는 것으로 설정
            runThread = true;
            // 시뮬레이션 단위 데이터 크기 설정
            int frameDataSize = 14/* 시뮬레이션 단위를 이루는 항목 개수 */ * 4 /*float 데이터 크기 */;
            // 전체 파일 크기를 시뮬레이션 단위 데이터 크기로 나누어 전체 시뮬레이션 단위 개수 계산
            long dataSize = modelFileData.Length / frameDataSize;
            // 시뮬레이션 단위를 읽기 위한 buffer 생성
            byte[] buff = new byte[frameDataSize];

            while (runThread)
            {
                int idx = 0, count = 0;
                // 시뮬레이션 데이터 파일의 처음으로 이동
                modelFileData.Seek(0, SeekOrigin.Begin);

                do
                {
                    if (!runThread) break;

                    // 시뮬레이션 데이터 파일에서 시뮬레이션 단위 데이터 읽기
                    count = modelFileData.Read(buff, 0, frameDataSize);

                    // 시뮬레이션 단위 데이터에서 속도 가져오기
                    double speed = BitConverter.ToSingle(buff, 0);
                    // 시뮬레이션 단위 데이터에서 위치의 위도 가져오기
                    double lat = BitConverter.ToSingle(buff, 4);
                    // 시뮬레이션 단위 데이터에서 위치의 경도 가져오기
                    double lon = BitConverter.ToSingle(buff, 8);
                    // 시뮬레이션 단위 데이터에서 위치의 높이 가져오기
                    double alt = BitConverter.ToSingle(buff, 12);

                    // 시뮬레이션 단위 데이터에서 자세의 yaw 가져오기
                    double yaw = BitConverter.ToSingle(buff, 16);
                    // 시뮬레이션 단위 데이터에서 자세의 roll 가져오기
                    double roll = BitConverter.ToSingle(buff, 20);
                    // 시뮬레이션 단위 데이터에서 자세의 pitch 가져오기
                    double pitch = BitConverter.ToSingle(buff, 24);

                    XGeoPoint geoPos = new XGeoPoint();
                    geoPos.lond = lon;
                    geoPos.latd = lat;
                    geoPos.hgt = alt;

                    // 모델의 위치 설정
                    SetPosition(geoPos);
                    // 모델의 자세 설정
                    SetYawPitchRoll(XAngle.FromDegree(yaw), XAngle.FromDegree(pitch), XAngle.FromDegree(roll));
                    // 100 milli second 동안 시뮬레이션을 쉰다.
                    Thread.Sleep(100);

                    idx++;
                }
                // Thread 종료 조건을 검사함
                while ((count == frameDataSize) && (idx < dataSize));
                Thread.Sleep(100);
            }

        }

        // 시뮬레이션을 시작하는 함수
        public void Start()
        {
            // 이미 thread가 실행된 상태이면 리턴
            if (modelThread != null) return;

            // SimulationThread 함수를 이용한 thread 생성
            modelThread = new Thread(SimulationThread);
            // Thread 시작
            modelThread.Start();
        }

    }
}
3.5 Form1의 메뉴 [Model]-[Add]를 클릭하여 MyPlane을 추가하기 위한 AddPlaneForm 클래스를 구현한다. AddPlaneForm을 “디자이너 보기”를 열어서 buttonLoadModel과 buttonLoadData 버튼을 더블 클릭한다. 또한 buttonOK 버튼도 더블 클릭하여 이벤트 함수를 추가한다.
AddPlaneForm 클래스를 통해 MyPlane 생성을 위한 모델 파일 경로, 시뮬레이션 데이터 경로, 모델 이름과 모델 ID를 입력할 수 있도록 한다. AddPlaneForm 클래스 구현은 아래와 같다.
C#
                                using System;
using System.Collections.Generic;
using System.ComponentModel;
using System.Data;
using System.Drawing;
using System.Linq;
using System.Text;
using System.Windows.Forms;

namespace XDL_PlanetView4
{
    public partial class AddPlaneForm : Form
    {
        public string pathModel;    // 모델 경로
        public string pathData;     // 시뮬레이션 데이터 경고
        public string nameModel;    // 모델 이름
        public int ID;              // 모델 식별자

        // AddPlaneForm 생성자
        public AddPlaneForm()
        {
            InitializeComponent();
        }

        // 3DS 모델 파일 경로를 설정하는 buttonLoadModel 버튼 이벤트 함수
        private void buttonLoadModel_Click(object sender, EventArgs e)
        {
            // 열기 대화 상자 생성
            OpenFileDialog dlg = new OpenFileDialog();
            // 3DS 모델 파일을 선택할 수 있도록 열기 대화상자 필터 설정
            dlg.Filter = "Model File(*.3ds)|*.3ds;||";
            if (dlg.ShowDialog() != System.Windows.Forms.DialogResult.OK) return;

            // 모델 경로 설정
            pathModel = dlg.FileName;
            textBoxPathModel.Text = pathModel;
        }

        // 시뮬레이션 데이터 경로를 설정하는 buttonLoadData 버튼 이벤트 함수
        private void buttonLoadData_Click(object sender, EventArgs e)
        {
            // 열기 대화 상자 생성
            OpenFileDialog dlg = new OpenFileDialog();
            dlg.Filter = "Data File(*.dat)|*.dat;||";
            if (dlg.ShowDialog() != System.Windows.Forms.DialogResult.OK) return;

            // 시뮬레이션 경로 설정
            pathData = dlg.FileName;
            textBoxPathData.Text = pathData;
        }

        // OK 버튼 이벤트 함수
        private void buttonOK_Click(object sender, EventArgs e)
        {
            ID = int.Parse(textBoxID.Text);
            nameModel = textBoxName.Text;
        }
    }
}
3.6 NCW 환경에 추가하는 Model를 관리하기 위해 List 객체를 추가한다.
List<MyPlane> 형의 변수를 추가한다.
C#
                                // NCW 모델을 관리하기 위한 List 객체
private List<MyPlane> modelList = new List<MyPlane>();
3.7 MyModel 클래스가 시뮬레이션을 시작하면 100 milli seconds마다 갱신되는 위치와 자세에 대해 화면에 갱신하여 도시할 수 있도록 thread 변수를 추가한다.
C#
                                // 화면 갱신을 위한 Thread
private Thread threadRefresh = null;
private bool runThread = false;
3.8 menuStrip1의 addModelToolStripMenuItem 메뉴를 더블 클릭하여 이벤트함수를 추가한다.
[Model]-[Add] 메뉴를 선택해서 NCW 환경에 MyPlane 모델을 추가할 수 있도록 한다.
C#
                                // 화면 갱신을 요청하는 thread를 위한 함수
public void RefreshScreenThread()
{
    // thread 실행 여부 설정
    runThread = true;
    while (runThread)
    {
        // xnwTheater의 가시영역 갱신
        xncwTheater.UpdateVisibleArea();

        // nxPlanetView2D와 nxPlanetView3D에 화면 갱신 요청
        nxPlanetView2D.RefreshScreen();
        nxPlanetView3D.RefreshScreen();

        // 100 mili second 동안 threading을 쉰다.
        Thread.Sleep(100);
    }
}

private void addModelToolStripMenuItem_Click(object sender, EventArgs e)
{
    // AddPlaneForm 생성하여 MyPlane을 위한 속성 설정
    AddPlaneForm addForm = new AddPlaneForm();
    if (addForm.ShowDialog() != System.Windows.Forms.DialogResult.OK) return;

    MyPlane newPlane = new MyPlane();
    // MyPlane 객체에 매개변수를 이용하여 초기화
    if (!newPlane.Initialize(addForm.pathModel, addForm.pathData, addForm.nameModel, addForm.ID))
    {
        MessageBox.Show("Model을 로딩할 수 없습니다.");
        return;
    }

    // MyPlane 객체의 크기조절 여부를 설정한다.
    newPlane.Scalable = false;

    XEquipObj newObj = newPlane;
    // xncwTheater에 새로운 모델을 추가한다.
    if (xncwTheater.AddEquipment(newPlane.modelID, ref newObj))
    {
        // 모델 리스트에 새로운 모델 추가
        modelList.Add(newPlane);

        // 새로운 모델의 시뮬레이션 시작
        newPlane.Start();
        // xncwTheater의 가시영역 갱신
        xncwTheater.UpdateVisibleArea();

        // nxPlanetView2D와 nxPlanetView3D의 도시 갱신 요청
        nxPlanetView2D.RefreshScreen();
        nxPlanetView3D.RefreshScreen();

        if (threadRefresh == null)
        {
            // 화면 갱신을 위한 thread 생성
            threadRefresh = new Thread(RefreshScreenThread);
            threadRefresh.Start();
        }

    }
    else
        // xncwTheater에 모델 추가를 하지 못하면 MyPlane을 해제한다.
        newPlane.Uninitialize();
}
3.9 Form1이 닫혀질 때 화면 갱신을 위한 thread와 MyPlane을 해제한다. 이를 위해 Form1에 “Closing” 이벤트를 추가한다.
C#
                                private void Form1_FormClosing(object sender, FormClosingEventArgs e)
{
    // 화면 갱신을 위한 thread를 해제한다.
    if (threadRefresh != null)
    {
        runThread = false;
        if (threadRefresh.IsAlive)
            threadRefresh.Join();
        threadRefresh = null;
    }

    // MyPlane 객체를 해제한다.
    foreach (MyPlane obj in modelList)
    {
        obj.Uninitialize();
    }
    modelList.Clear();
}
3.10 솔루션을 빌드하고 실행한다.
솔루션을 실행하여 메뉴 [Model]-[Add]를 클릭한다.
시뮬레이션 모델을 추가하기 위해서 모델 파일과 시뮬레이션 파일을 설정한다. 두 개의 파일은 홈페이지에 예제 파일과 함께 있는 샘플데이터를 이용하길 바란다. AddPlaneForm에서 buttonLoadModel 버튼을 클릭해서 “uav0216.3DS” 파일을 선택하고, buttonLoadData 버튼을 클릭해서
“FlightData1.dat” 파일을 선택한다.
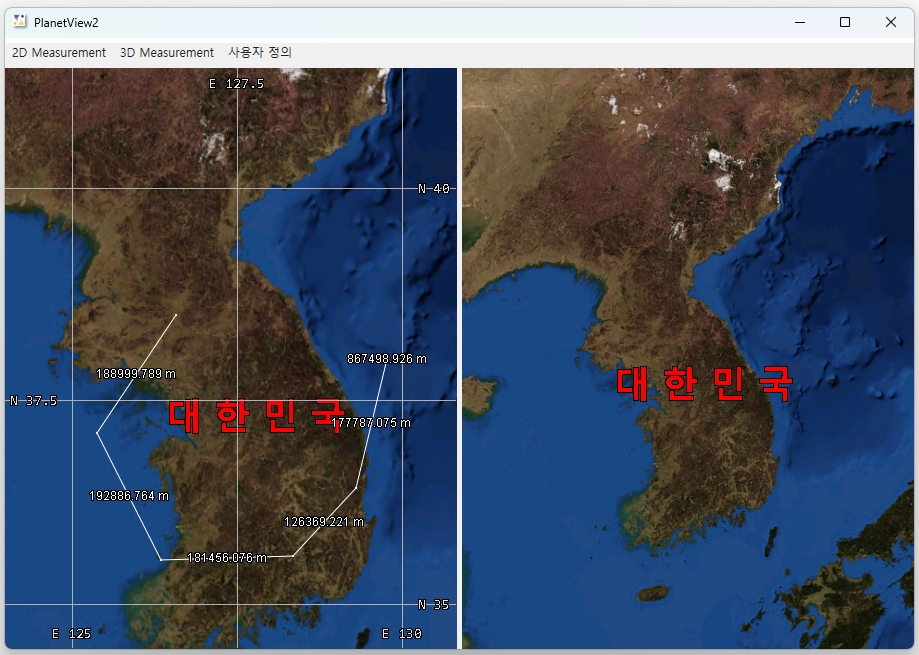
ID와 Name 속성도 설정하고 “OK” 버튼을 클릭한다. 새로운 모델이 추가되면 nxPlanetView2D와 nxPlanetView3D에 모델이 추가되어 화면에 도시되고 100 milli seconds마다 비행체의 위치와 자세가 변화되는 것을 확인할 수 있다.
3.11 MyPlane 객체의 도시속성 및 카메라 모드를 설정하는 PlaneProperty 클래스를 구현한다. xncwTheater의 Pick 함수로 선택된 객체가 return되면 이 클래스를 이용하여 객체의 속성을 변경한다.
PlaneProperty Form에 Load 이벤트와 buttonOK 버튼에 Click 이벤트 함수를 추가하고 코드를 작성한다. PlaneProperty의 구현 내용은 아래와 같다.
C#
                                using System;
using System.Collections.Generic;
using System.ComponentModel;
using System.Data;
using System.Drawing;
using System.Linq;
using System.Text;
using System.Windows.Forms;

using Pixoneer.NXDL.NNCW;

namespace XDL_PlanetView4
{
    public partial class PlaneProperty : Form
    {
        public string modelName;            // 모델 이름
        public int modelID;

        public double modelScaleX, modelScaleY, modelScaleZ;    // 모델 크기 조절 요소
        public bool modelScalable;  // 모델 크기 조절 여부
        public XncwObserver.eViewMode cameraMode;   // 카메라 모드
        public bool modelShowBoundingBox;   // 모델 경계 영역 도시 여부

        public PlaneProperty()
        {
            InitializeComponent();

            modelName = "";
            modelID = 0;
            modelScaleX = modelScaleY = modelScaleZ = 1.0;
            modelScalable = false;
            cameraMode = XncwObserver.eViewMode.Unusable;
            modelShowBoundingBox = false;
        }

        private void PlaneProperty_Load(object sender, EventArgs e)
        {
            textBoxID.Text = modelID.ToString();
            textBoxName.Text = modelName;

            textBoxScaleX.Text = modelScaleX.ToString();
            textBoxScaleY.Text = modelScaleY.ToString();
            textBoxScaleZ.Text = modelScaleZ.ToString();
            checkBoxScalable.Checked = modelScalable;
            checkBoxShowBoundingBox.Checked = modelShowBoundingBox;

            int idx = (int)cameraMode;
            // Camera mode가 유효한 값이 아닌 경우, Camera mode를 위한 combo box의 마지막 아이템인 Unusable로 설정
            if (idx < 0 || idx >= comboBoxCameraMode.Items.Count)
                idx = comboBoxCameraMode.Items.Count - 1;

            comboBoxCameraMode.SelectedIndex = idx;
        }

        private void buttonOK_Click(object sender, EventArgs e)
        {
            int idx = comboBoxCameraMode.SelectedIndex;
            // Camera mode가 유효하지 않는 경우에는 Unusable으로 설정
            if (idx > (int)XncwObserver.eViewMode.Far2Obj)
                idx = (int)XncwObserver.eViewMode.Unusable;

            cameraMode = (XncwObserver.eViewMode)idx;
            modelName = textBoxName.Text;

            // 모델 크기 조절. ModelScalable이 true인 경우 적용된다.
            modelScaleX = double.Parse(textBoxScaleX.Text);
            modelScaleY = double.Parse(textBoxScaleY.Text);
            modelScaleZ = double.Parse(textBoxScaleZ.Text);
            modelScalable = checkBoxScalable.Checked;
            modelShowBoundingBox = checkBoxShowBoundingBox.Checked;
        }
    }
}
3.12 xncwTheater의 OnPicked 이벤트 함수를 추가하고 PlaneProperty 클래스를 이용하여 모델의 도시속성을 변경하는 코드를 추가한다.
xncwTheater의 OnPicked 이벤트 함수는 xncwTheater_OnPicked로 한다.
C#
                                bool xncwTheater_OnPicked(object sender, NXPlanetDrawArgs e, long ID)
{
    // ID에 대응되는 장비를 xncwTheater에서 가져온다.
    XEquipObj obj = xncwTheater.GetEquipment(ID);
    // ID에 대응되는 객체가 없는 경우 null 객체를 반환한다.
    if (obj == null) return false;

    MyPlane modelPlane = (MyPlane)obj;

    // MyPlane 객체의 속성으로 PlaneProperty 값을 설정한다.
    PlaneProperty property = new PlaneProperty();
    property.modelID = (int)ID;
    property.modelName = modelPlane.modelName;
    property.modelScalable = modelPlane.Scalable;
    property.modelScaleX = modelPlane.Scale.x;
    property.modelScaleY = modelPlane.Scale.y;
    property.modelScaleZ = modelPlane.Scale.z;
    property.modelShowBoundingBox = modelPlane.modelShowBoundingBox;
    property.cameraMode = modelPlane.cameraMode;
    if (property.ShowDialog() != System.Windows.Forms.DialogResult.OK)
        return false;

    // PlaneProperty Form을 이용해 설정한 값을 MyPlane에 설정한다.
    modelPlane.Scalable = property.modelScalable;
    modelPlane.Scale.x = property.modelScaleX;
    modelPlane.Scale.y = property.modelScaleY;
    modelPlane.Scale.z = property.modelScaleZ;
    modelPlane.ShowBoundingBox(property.modelShowBoundingBox);
    modelPlane.cameraMode = property.cameraMode;

    // CameraMode를 Unusable로 설정한 경우,
    // 특정 객체를 주시하는 것이 아니라 모든 객체를 확인할 수 있도록
    // xncwObserver2D, xncwObserver3D의 SurveyNone() 함수로 설정
    if (modelPlane.cameraMode == XncwObserver.eViewMode.Unusable)
    {
        xncwObserver2D.SurveyNone();
        xncwObserver3D.SurveyNone();
    }
    else
    {
        // xncwObserver2D에서 선택한 객체와 camera mode로 대상 객체를 주시하도록 설정
        xncwObserver2D.SurveyTargetObj(obj, modelPlane.cameraMode);
        // 객체 주시를 위한 거리를 설정
        xncwObserver2D.SetDistance(4000);
        // xncwObserver3D에서 선택한 객체와 camera mode로 대상 객체를 주시하도록 설정
        xncwObserver3D.SurveyTargetObj(obj, modelPlane.cameraMode);
        xncwObserver3D.SetDistance(4000);
    }

    // xncwTheater의 가시 영역을 갱신한다.
    xncwTheater.UpdateVisibleArea();

    // nxPlanetView2D와 nxPlanetView3D에 화면 갱신을 요청한다.
    nxPlanetView2D.RefreshScreen();
    nxPlanetView3D.RefreshScreen();

    return default(bool);
}
3.13 nxPlanetView2D에서 시뮬레이션 모델을 마우스 더블 클릭하면 해당 모델의 도시 속성 및 camera 모드를 설정할 수 있도록 한다. 이를 위해 nxPlanetView2D에 NXPlanetLayer를 추가하고 xncwTheater의 Pick함수와 OnPicked 이벤트를 이용한다.
NXPlanetLayer 클래스의 nxPlanetLayer2D 변수를 추가하고 Form1의 Load 함수에서 nxPlanetView2D에 추가하고 nxPlanetLayer2D의 OnWndProc 이벤트 함수와 xncwTheater의 OnPicked 이벤트 함수를 Form1 생성자에 추가한다. 코드는 아래와 같다.
C#
                                private NXPlanetLayer nxPlanetLayer2D;

public Form1()
{
    …

    // 윈도우 이벤트를 받기 위한 NXPlanetLayer 변수 및 이벤트 함수 추가
    nxPlanetLayer2D = new NXPlanetLayer();
    nxPlanetLayer2D.OnWndProc += new NXPlanetLayerWndProcEvent(nxPlanetLayer2D_OnWndProc);

    // xncwTheater의 OnPicked 이벤트 함수 추가
    xncwTheater.OnPicked += new XncwTheaterPickEvent(xncwTheater_OnPicked);
}

private void Form1_Load(object sender, EventArgs e)
{
    nxPlanetView2D.AddRenderLayer(ref nxPlanetLayer2D);
…
}

// nxPlanetLayer2D 레이어의 OnWndProc 이벤트 함수
bool nxPlanetLayer2D_OnWndProc(object sender, NXPlanetDrawArgs e, ref Message m)
{
    // 마우스 왼쪽 버튼을 더블 클릭
    if (m.Msg == Pixoneer.NXDL.XWndMsg.XWM_LBUTTONDBLCLK)
    {
        // 화면 좌표
        XVertex2d scrPos = new XVertex2d();
        scrPos.x = Pixoneer.NXDL.XWndMsg.GetLowValue(m.LParam);
        scrPos.y = Pixoneer.NXDL.XWndMsg.GetHighValue(m.LParam);

        // xncwTheater에 화면 좌표에 대해 nxPlanetView2D에서 hit-test를 수행한다.
        // Pick 함수가 성공적으로 실행되면 xncwTheater의 OnPicked가 호출된다.
        xncwTheater.Pick(nxPlanetView2D.GetHandle(), scrPos);
    }
    return default(bool);
}
3.14 솔루션을 빌드하고 실행한다.
프로그램에서 비행체를 추가한 뒤 nxPlanetView2D에서 비행체를 더블 클릭한다. 비행체가 선택되면 PlaneProperty Form이 생성되고 이 Form에서 CameraMode를 “Front View”를 선택하고 OK 버튼을 클릭한다.
1 기본 프로그램 작성
1.1 Visual Studio 2022를 이용하여 예제
“XDL_PlanetView1”
및 앞선 PlanetView 튜토리얼의 “기본 프로그램 작성” 방법을 참고로 기본 프로젝트를 생성한다.
프로젝트 이름은 “XDL_PlanetView4”로 한다.
1.2 Pixoneer.NXDL.NNCW와 Pixoneer.NXDL.NEQUIP을 이용하기 위해서 “NXDLncw.dll”을 프로젝트의 참조로 추가한다.
3.1 Window.xaml.cs에 NCW를 위한 변수를 추가하고 Window.xaml.cs의 생성자에서 초기화한다.
NCW 환경을 위한 레이어는 Pixoneer.NXDL.NNCW.XncwTheater xncwTheater 변수로 하고, Planet 2D와 3D에서 시뮬레이션 주시를 위한 레이어는 각각 Pixoneer.NXDL.NNCW.XncwObserver의 xncwObserver2D, xncwObserver3D로 하겠다. 코드는 아래와 같다.
C#
                                using Pixoneer.NXDL;             // 기본 함수 관련 기능
using Pixoneer.NXDL.NXPlanet;    // 구 기반 도시 관련 기능
using Pixoneer.NXDL.NNCW;        // NCW 환경 관련 기능
using Pixoneer.NXDL.NEQUIP;      // NCW 환겨에서 시뮬레이션하는 모델 관련 기능

namespace XDL_PlanetView4
{
    public partial class MainWindow : Window
    {
        private XncwTheater xncwTheater;       // ncw 환경을 위한 레이어
        private XncwObserver xncwObserver2D;   // 2D Planet에서 시뮬레이션 모델 주시 기능을 담당할 레이어
        private XncwObserver xncwObserver3D;   // 3D Planet에서 시뮬레이션 모델 주시 기능을 담당할 레이어

        public MainWindow()
        {
            InitializeComponent();

            // PlanetView 2D/3D의 배경색 설정
            nxPlanetView2D.BackColor = System.Drawing.Color.Black;
            nxPlanetView3D.BackColor = System.Drawing.Color.Black;

            // NCW를 위한 theater 객체, observer 객체 생성
            xncwTheater = new XncwTheater();
            xncwObserver2D = new XncwObserver();
            xncwObserver3D = new XncwObserver();
        }
    }
}
3.2 Window을 선택하고 [속성] 창 - [이벤트] 메뉴를 선택한 뒤 “Loaded” 이벤트와 “Closed” 이벤트를 더블 클릭한다.
Window_Loaded 함수에는 xncwTheater와 xncwObserver2D, xncwObserver3D를 nxPlanetView2D와 nxPlanetView3D에 추가하고 각 view의 카메라 초기값을 설정한다.
C#
                                private void Window_Loaded(object sender, RoutedEventArgs e)
{
    nxPlanetView2D.AddRenderLayer(ref nxPlanetLayer2D);

    // Theater 객체를 Planet 2D/3D 뷰에 추가
    xncwTheater.AttachTo(nxPlanetView2D);
    xncwTheater.AttachTo(nxPlanetView3D);

    // Theater의 모든 객체를 PlanetView 3D에서는 항상 주시할 수 있도록 설정
    xncwTheater.ShowAllObjects(nxPlanetView3D, true);

    // 각 PlanetView에 관찰을 위한 Observer 객체를 각각 추가한다.
    xncwObserver2D.AttachTo(nxPlanetView2D);
    xncwObserver3D.AttachTo(nxPlanetView3D);

    XGeoPoint gpEye = XGeoPoint.FromDegree(127.4, 38.0, 1500000);
    // Planet2D 모드의 camera 위치 설정
    nxPlanetView2D.SetCameraPosition(gpEye, XAngle.FromDegree(0.0));
    // Planet3D 모드의 camera 위치 설정
    nxPlanetView3D.SetCameraPosition(gpEye, XAngle.FromDegree(0.0), XAngle.FromDegree(-90.0), XAngle.FromDegree(0.0));
}

private void Window_Closed(object sender, EventArgs e)
{
    Xfn.Close();
}
3.3 시뮬레이션 대상인 모델을 구현하기 위해서 프로젝트에 새로운 클래스를 추가한다.
시뮬레이션 대상의 모델은 MyPlane으로 하고 이를 프로젝트에 추가한다. Visual Studio 2022의 메뉴 [프로젝트]-[새 항목 추가] 또는 [솔루션 탐색기]에서 “XDL_PlanetView4” 프로젝트를 선택한 후 마우스 오른쪽 버튼을 클릭하여 생기는 메뉴 중 [추가]-[새 항목]을 선택한다. “새 항목
추가” 대화상자에서 “모든 템플릿 표시”를 클릭하고, “클래스”를 선택한 후 이름을 “MyPlane.cs”로 하고 “추가” 버튼을 클릭한다.
MyPlane은 시뮬레이션을 위한 모델파일을 로딩하여 파일에 저장되어 있는 시뮬레이션 데이터를 100 milli seconds마다 읽어 위치와 자세를 설정하도록 한다. 이를 위해서 System.Threading 관련 기능과 System.IO 관련 기능을 사용한다. MyPlane 클래스 구현은 아래와 같다.
C#
                                using System;
using System.Collections.Generic;
using System.Linq;
using System.Text;

using System.IO;          // FileStream 관련 기능
using System.Threading;   // Threading 관련 기능

using Pixoneer.NXDL;          // 기본 함수 관련 기능
using Pixoneer.NXDL.NNCW;     // NCW 환경 관련 기능
using Pixoneer.NXDL.NEQUIP;   // NCW 환경에서 시뮬레이션하는 모델 관련 기능

namespace XDL_PlanetView4
{
    class MyPlane : XAircraft
    {
        public string modelPathData;  // 시뮬레이션 데이터 파일 경로
        public string modelPathModel; // 모델 파일 경로
        public string modelName;      // 모델 이름
        public int modelID;           // 모델 구별자

        // 시뮬레이션 주시(관측) 모드
        public XncwObserver.eViewMode cameraMode;
        // 모델의 경계 영역 도시 여부
        public bool modelShowBoundingBox;

        private FileStream modelFileData;      // 시뮬레이션 데이터파일
        private Thread modelThread;            // 시뮬레이션을 위한 쓰레드
        private bool runThread;                // 시뮬레이션 쓰레드 여부 결정
        //internal bool Scalable;

        // 클래스 생성자
        public MyPlane()
        {
            modelPathData = "";
            modelPathModel = "";
            modelName = "MyPlane";
            modelID = 0;

            // Camera 관측모드
            // Unuable인 경우 특정 모델을 주시하지 않을 때 사용
            cameraMode = XncwObserver.eViewMode.Unusable;
            modelShowBoundingBox = false;
            modelFileData = null;
            modelThread = null;
            runThread = false;
        }

        // 모델 경로, 시뮬레이션 데이터 경로, 이름 및 ID를 입력으로 받아 초기화하는 함수
        public bool Initialize(string pathModel, string pathData, string name, int nID)
        {
            // 파일 경로로부터 모델 데이터 로딩
            if (!LoadModel(pathModel)) return false;

            // 멤버 변수 설정
            modelName = name;
            modelID = nID;
            modelPathData = pathData;

            // 시뮬레이션 데이터 로딩
            modelFileData = new FileStream(modelPathData, FileMode.Open, FileAccess.Read);
            return true;
        }

        // 시뮬레이션 기능 및 데이터를 해제하는 함수
        public void Uninitialize()
        {

            // 쓰레드가 있는 경우 이를 해제
            if (modelThread != null)
            {
                runThread = false;
                if (modelThread.IsAlive)
                    modelThread.Join();
                modelThread = null;

            }
            // 시뮬레이션 데이터가 있는 경우 이를 해제
            if (modelFileData != null) modelFileData.Close();
        }

        // 시뮬레이션 함수
        public void SimulationThread()
        {
            // 시뮬레이션 데이터가 없는 경우 진행하지 않는다.
            if (modelFileData == null) return;

            // 시뮬레이션 실행 여부를 실행하는 것으로 설정
            runThread = true;
            // 시뮬레이션 단위 데이터 크기 설정
            int frameDataSize = 14/* 시뮬레이션 단위를 이루는 항목 개수 */ * 4 /*float 데이터 크기 */;
            // 전체 파일 크기를 시뮬레이션 단위 데이터 크기로 나누어 전체 시뮬레이션 단위 개수 계산
            long dataSize = modelFileData.Length / frameDataSize;
            // 시뮬레이션 단위를 읽기 위한 buffer 생성
            byte[] buff = new byte[frameDataSize];

            while (runThread)
            {
                int idx = 0, count = 0;
                // 시뮬레이션 데이터 파일의 처음으로 이동
                modelFileData.Seek(0, SeekOrigin.Begin);

                do
                {
                    if (!runThread) break;

                    // 시뮬레이션 데이터 파일에서 시뮬레이션 단위 데이터 읽기
                    count = modelFileData.Read(buff, 0, frameDataSize);

                    // 시뮬레이션 단위 데이터에서 속도 가져오기
                    double speed = BitConverter.ToSingle(buff, 0);
                    // 시뮬레이션 단위 데이터에서 위치의 위도 가져오기
                    double lat = BitConverter.ToSingle(buff, 4);
                    // 시뮬레이션 단위 데이터에서 위치의 경도 가져오기
                    double lon = BitConverter.ToSingle(buff, 8);
                    // 시뮬레이션 단위 데이터에서 위치의 높이 가져오기
                    double alt = BitConverter.ToSingle(buff, 12);

                    // 시뮬레이션 단위 데이터에서 자세의 yaw 가져오기
                    double yaw = BitConverter.ToSingle(buff, 16);
                    // 시뮬레이션 단위 데이터에서 자세의 roll 가져오기
                    double roll = BitConverter.ToSingle(buff, 20);
                    // 시뮬레이션 단위 데이터에서 자세의 pitch 가져오기
                    double pitch = BitConverter.ToSingle(buff, 24);

                    XGeoPoint geoPos = new XGeoPoint();
                    geoPos.lond = lon;
                    geoPos.latd = lat;
                    geoPos.hgt = alt;

                    // 모델의 위치 설정
                    SetPosition(geoPos);
                    // 모델의 자세 설정
                    SetYawPitchRoll(XAngle.FromDegree(yaw), XAngle.FromDegree(pitch), XAngle.FromDegree(roll));
                    // 100 milli second 동안 시뮬레이션을 쉰다.
                    Thread.Sleep(100);

                    idx++;
                }
                // Thread 종료 조건을 검사함
                while ((count == frameDataSize) && (idx < dataSize));
                Thread.Sleep(100);
            }
        }

        // 시뮬레이션을 시작하는 함수
        public void Start()
        {
            // 이미 thread가 실행된 상태이면 리턴
            if (modelThread != null) return;

            // SimulationThread 함수를 이용한 thread 생성
            modelThread = new Thread(SimulationThread);
            // Thread 시작
            modelThread.Start();
        }
    }
}
3.5 Window의 메뉴 [Model]-[Add]를 클릭하여 MyPlane을 추가하기 위한 AddPlane클래스를 구현한다. AddPlane.xaml 창을 열고 Window창에서 Model을 불러오는 버튼과 Data을 불러오는 버튼을 더블 클릭한다. 또한 [OK] 버튼과 [Cancel] 버튼도 더블 클릭하여 이벤트 함수를 추가한다.
AddPlane 클래스를 통해 MyPlane 생성을 위한 모델 파일 경로, 시뮬레이션 데이터 경로, 모델 이름과 모델 ID를 입력할 수 있도록 한다. AddPlane 클래스 구현은 아래와 같다.
C#
                                // AddPlane.xaml.cs

namespace XDL_PlanetView4
{
    public partial class AddPlane : Window
    {
        public string pathModel;  // 모델 경로
        public string pathData;   // 시뮬레이션 데이터 경고
        public string nameModel;  // 모델 이름
        public int ID;            // 모델 식별자

        // AddPlane 생성자
        public AddPlane()
        {
            InitializeComponent();
        }

        // OK 버튼 이벤트함수
        private void buttonOK_Click(object sender, RoutedEventArgs e)
        {
            this.DialogResult = true;
            ID = int.Parse(textBoxID.Text);
            nameModel = textBoxName.Text;
        }

        private void buttonCancel_Click(object sender, RoutedEventArgs e)
        {
            this.DialogResult = false;
        }

         // 3DS 모델 파일 경로를 설정하는 buttonLoadModel 버튼 이벤트 함수
        private void buttonLoadModel_Click(object sender, RoutedEventArgs e)
        {
            // 열기 대화 상자 생성
            OpenFileDialog dlg = new OpenFileDialog();
            // 3DS 모델 파일을 선택할 수 있도록 열기 대화상자 필터 설정
            dlg.Filter = "Model FIle(*.3ds)|*.3ds;||";
            Nullable<bool> result = dlg.ShowDialog();
            if (result != true) return;

            // 모델 경로 설정
            pathModel = dlg.FileName;
            textBoxPathModel.Text = pathModel;
        }

        // 시뮬레이션 데이터 경로를 설정하는 buttonLoadData 버튼 이벤트 함수
        private void buttonLoadData_Click(object sender, RoutedEventArgs e)
        {
            // 열기 대화 상자 생성
            OpenFileDialog dlg = new OpenFileDialog();
            dlg.Filter = "Data File(*.dat)|*.dat;||";
            Nullable<bool> result = dlg.ShowDialog();
            if (result != true) return;

            // 시뮬레이션 경로 설정
            pathData = dlg.FileName;
            textBoxPathData.Text = pathData;
        }
    }
}
3.6 NCW 환경에 추가하는 Model를 관리하기 위해 List 객체를 MainWindow.xaml에 추가한다.
List<MyPlane> 형의 변수를 추가한다.
C#
                                // NCW 모델을 관리하기 위한 List 객체
private List<MyPlane> modelList = new List<MyPlane>();
3.7 MyModel 클래스가 시뮬레이션을 시작하면 100 milliseconds마다 갱신되는 위치와 자세에 대해 화면에 갱신하여 도시할 수 있도록 thread 변수를 추가한다.
C#
                                // 화면 갱신을 위한 Thread
private Thread threadRefresh = null;
private bool runThread = false;

// 화면 갱신을 요청하는 thread를 위한 함수
public void RefreshScreenThread()
{
    // thread 실행 여부 설정
    runThread = true;
    while (runThread)
    {
        // xnwTheater의 가시영역 갱신
        xncwTheater.UpdateVisibleArea();

        // nxPlanetView2D와 nxPlanetView3D에 화면 갱신 요청
        nxPlanetView2D.RefreshScreen();
        nxPlanetView3D.RefreshScreen();

        // 100 mili second 동안 threading을 쉰다.
        Thread.Sleep(100);
    }
}
3.8 Menu의 [Model]-[Add]를 클릭한 후 [속성]창에서 Click을 더블 클릭하여 이벤트함수를 추가한다.
[Model]-[Add] 메뉴를 선택해서 NCW 환경에 MyPlane 모델을 추가할 수 있도록 한다.
C#
                                private void addModelMenuItem_Click(object sender, RoutedEventArgs e)
{
    // AddPlane 생성하여 MyPlane을 위한 속성 설정
    AddPlane addForm = new AddPlane();

    Nullable<bool> result = addForm.ShowDialog();
    if (result != true) return;

    MyPlane newPlane = new MyPlane();
    // MyPlane 객체에 매개변수를 이용하여 초기화
    if (!newPlane.Initialize(addForm.pathModel, addForm.pathData, addForm.nameModel, addForm.ID))
    {
        MessageBox.Show("Model을 로딩할 수 없습니다.");
        return;
    }

    // MyPlane 객체의 크기조절 여부를 조절한다.
    newPlane.Scalable = false;

    XEquipObj newObj = newPlane;
    // xncwTheater에 새로운 모델을 추가한다.
    if (xncwTheater.AddEquipment(newPlane.modelID, ref newObj))
    {
        // 모델 리스트에 새로운 모델 추가
        modelList.Add(newPlane);

        // 새로운 모델의 시뮬레이션 시작
        newPlane.Start();
        // xncwTheater의 가시영역 갱신
        xncwTheater.UpdateVisibleArea();

        // nxPlanetView2D와 nxPlanetView3D의 도시 갱신 요청
        nxPlanetView2D.RefreshScreen();
        nxPlanetView3D.RefreshScreen();

        if (threadRefresh == null)
        {
            // 화면 갱신을 위한 thread 생성
            threadRefresh = new Thread(RefreshScreenThread);
            threadRefresh.Start();
        }
    }
    else
        // xncwTheater에 모델 추가를 하지 못하면 MyPlane을 해제한다.
        newPlane.Uninitialize();
}
3.9 Window가 닫힐 때 화면 갱신을 위한 thread와 MyPlane을 해제한다. 이를 위해 Window에 “Closing” 이벤트를 추가한다.
C#
                                private void Window_Closing(object sender, System.ComponentModel.CancelEventArgs e)
{
    // 화면 갱신을 위한 thread를 해제한다.
    if (threadRefresh != null)
    {
        runThread = false;
        if (threadRefresh.IsAlive)
            threadRefresh.Join();
        threadRefresh = null;
    }

    // MyPlane 객체를 해제한다.
    foreach (MyPlane obj in modelList)
    {
        obj.Uninitialize();
    }
    modelList.Clear();
}
3.10 솔루션을 빌드하고 실행한다.
솔루션을 실행하여 메뉴 [Model]-[Add]를 클릭한다.
시뮬레이션 모델을 추가하기 위해서 모델 파일과 시뮬레이션 파일을 설정한다. 두 개의 파일은 홈페이지에 예제 파일과 함께 있는 샘플데이터를 이용하길 바란다. AddPlane에서 Model을 불러오는 버튼을 클릭해서 “uav0216.3DS” 파일을 선택한다. 이어서 Data를 불러오는 버튼을 클릭해서
“FlightData1.dat” 파일을 선택한다.
ID와 Name 속성도 설정하고 “OK” 버튼을 클릭한다. 새로운 모델이 추가되면 nxPlanetView2D와 nxPlanetView3D에 모델이 추가되어 화면에 도시되고 100 milliseconds마다 비행체의 위치와 자세가 변화되는 것을 확인할 수 있다.
3.11 nxPlanetView2D에서 시뮬레이션 모델을 마우스 더블 클릭하면 해당 모델의 도시 속성 및 camera 모드를 설정할 수 있도록 한다. 이를 위해 nxPlanetView2D에 NXPlanetLayer를 추가하고 xncwTheater의 Pick함수와 OnPicked 이벤트를 이용한다.
NXPlanetLayer 클래스의 nxPlanetLayer2D 변수를 추가하고 Window의 Loaded 함수에서 nxPlanetView2D에 추가하고 nxPlanetLayer2D의 OnWndProc 이벤트 함수와 xncwTheater의 OnPicked 이벤트 함수를 추가한다. 코드는 아래와 같다.
C#
                                private NXPlanetLayer nxPlanetLayer2D;

public MainWindow()
{
    ...

    // 윈도우 이벤트를 받기 위한 NXPlanetLayer 변수 및 이벤트 함수 추가
    nxPlanetLayer2D = new NXPlanetLayer();
    nxPlanetLayer2D.OnWndProc += new NXPlanetLayerWndProcEvent(nxPlanetLayer2D_OnWndProc);

    // xncwTheater의 OnPicked 이벤트 함수 추가
    xncwTheater.OnPicked += new XncwTheaterPickEvent(xncwTheater_OnPicked);
}

private bool nxPlanetLayer2D_OnWndProc(object sender, NXPlanetDrawArgs e, ref System.Windows.Forms.Message m)
{
    // 마우스 왼쪽 버튼을 더블 클릭
    if (m.Msg == Pixoneer.NXDL.XWndMsg.XWM_LBUTTONDBLCLK)
    {
        // 화면 좌표
        XVertex2d scrPos = new XVertex2d();
        scrPos.x = Pixoneer.NXDL.XWndMsg.GetLowValue(m.LParam);
        scrPos.y = Pixoneer.NXDL.XWndMsg.GetHighValue(m.LParam);

        // xncwTheater에 화면 좌표에 대해 nxPlanetView2D에서 hit-test를 수행한다.
        // Pick 함수가 성공적으로 실행되면 xncwTheater의 OnPicked가 호출된다.
        xncwTheater.Pick(nxPlanetView2D.GetHandle(), scrPos);
    }
    return default(bool);
}
3.12 MyPlane 객체의 도시속성 및 카메라 모드를 설정하는 PlaneProperty 클래스를 구현하다. xncwTheater의 Pick 함수로 선택된 객체가 return되면 이 클래스를 이용하여 객체의 속성을 변경한다.
PlaneProperty Window에 Loaded 이벤트와 [OK] 버튼과 [Cancel] 버튼에 Click 이벤트 함수를 추가하고 코드를 작성한다. PlaneProperty의 구현 내용은 아래와 같다.
C#
                                using Pixoneer.NXDL.NNCW;

namespace XDL_PlanetView4
{
    public partial class PlaneProperty : Window
    {
        public string modelName;    // 모델 이름
        public int modelID;

        public double modelScaleX, modelScaleY, modelScaleZ;    // 모델 크기 조절 요소
        public bool modelScalable;                              // 모델 크기 조절 여부
        public XncwObserver.eViewMode cameraMode;               // 카메라 모드
        public bool modelShowBoundingBox;                       // 모델 경계 영역 도시 여부

        public PlaneProperty()
        {
            InitializeComponent();

            modelName = "";
            modelID = 0;
            modelScaleX = modelScaleY = modelScaleZ = 2.0;
            modelScalable = false;
            cameraMode = XncwObserver.eViewMode.Unusable;
            modelShowBoundingBox = false;
        }

        private void Window_Loaded(object sender, RoutedEventArgs e)
        {
            textBoxID.Text = modelID.ToString();
            textBoxName.Text = modelName;

            textBoxScaleX.Text = modelScaleX.ToString();
            textBoxScaleY.Text = modelScaleY.ToString();
            textBoxScaleZ.Text = modelScaleZ.ToString();

            checkBoxScalable.IsChecked = modelScalable;
            checkBoxShowBoundingBox.IsChecked = modelShowBoundingBox;

            int idx = (int)cameraMode;

            // Camera mode가 유효한 값이 아닌 경우, Camera mode를 위한 combo box의 마지막 아이템인 Unusable로 설정
            if (idx < 0 || idx >= comboBoxCameraMode.Items.Count)
                idx = comboBoxCameraMode.Items.Count - 1;

            comboBoxCameraMode.SelectedIndex = idx;
        }

        private void buttonOK_Click(object sender, RoutedEventArgs e)
        {
            this.DialogResult = true;
            int idx = comboBoxCameraMode.SelectedIndex;

            // Camera mode가 유효하지 않는 경우에는 Inusable으로 설정
            if (idx > (int)XncwObserver.eViewMode.Far2Obj)
                idx = (int)XncwObserver.eViewMode.Unusable;

            cameraMode = (XncwObserver.eViewMode)idx;
            modelName = textBoxName.Text;

            // 모델 크기 조절. ModelScalable이 true인 경우 적용된다.
            modelScaleX = double.Parse(textBoxScaleX.Text);
            modelScaleY = double.Parse(textBoxScaleY.Text);
            modelScaleZ = double.Parse(textBoxScaleZ.Text);

            Nullable<bool> result = checkBoxScalable.IsChecked;
            if (result != true)
            {
                modelScalable = false;
            }
            else
            {
                modelScalable = true;
            }

            Nullable<bool> result1 = checkBoxShowBoundingBox.IsChecked;
            if (result1 != true)
            {
                modelShowBoundingBox = false;
            }
            else
            {
                modelShowBoundingBox = true;
            }
        }

        private void buttonCancel_Click(object sender, RoutedEventArgs e)
        {
            this.DialogResult = false;
        }
    }
}
3.13 xncwTheater의 OnPicked 이벤트 함수를 추가하고 PlaneProperty 클래스를 이용하여 모델의 도시속성을 변경하는 코드를 추가한다.
xncwTheater의 OnPicked 이벤트 함수는 xncwTheater_OnPicked로 한다.
C#
                                bool xncwTheater_OnPicked(object sender, NXPlanetDrawArgs e, long ID)
{
    // ID에 대응되는 장비를 xncwTheater에서 가져온다.
    XEquipObj obj = xncwTheater.GetEquipment(ID);
    // ID에 대응되는 객체가 없는 경우 null 객체를 반환한다.
    if (obj == null) return false;

    MyPlane modelPlane = (MyPlane)obj;

    //MyPlane 객체의 속성으로 PlaneProperty 값을 설정한다.
    Action action = () =>
    {
        PlaneProperty property = new PlaneProperty();

        property.modelID = (int)ID;
        property.modelName = modelPlane.modelName;
        property.modelScalable = modelPlane.Scalable;
        property.modelScaleX = modelPlane.Scale.x;
        property.modelScaleY = modelPlane.Scale.y;
        property.modelScaleZ = modelPlane.Scale.z;
        property.modelShowBoundingBox = modelPlane.modelShowBoundingBox;
        property.cameraMode = modelPlane.cameraMode;

        Nullable<bool> result = property.ShowDialog();
        if (result != true)
        {
            return;// false;
    }

        // PlaneProperty xaml을 이용해 설정한 값을 MyPlane에 설정한다.
        modelPlane.Scalable = property.modelScalable;
        modelPlane.Scale = new XVertex3d(property.modelScaleX, property.modelScaleY, property.modelScaleZ);

        modelPlane.ShowBoundingBox(property.modelShowBoundingBox);
        modelPlane.cameraMode = property.cameraMode;

        // CameraMode를 Unusable로 설정한 경우,
        // 특정 객체를 주시하는 것이 아니라 모든 객체를 확인할 수 있도록 xncwObserver2D, xncwObserver3D의 SurveyNone() 함수로 설정
        if (modelPlane.cameraMode == XncwObserver.eViewMode.Unusable)
        {
            xncwObserver2D.SurveyNone();
            xncwObserver3D.SurveyNone();
        }
        else
        {
        // xncwObserver2D에서 선택한 객체와 camera mode로 대상 객체를 주시하도록 설정
        xncwObserver2D.SurveyTargetObj(obj, modelPlane.cameraMode);
        // 객체 주시를 위한 거리를 설정
        xncwObserver2D.SetDistance(4000);
        // xncwObserver3D에서 선택한 객체와 camera mode로 대상 객체를 주시하도록 설정
        xncwObserver3D.SurveyTargetObj(obj, modelPlane.cameraMode);
            xncwObserver3D.SetDistance(4000);
        }

        // xncwTheater의 가시 영역을 갱신한다.
        xncwTheater.UpdateVisibleArea();

        // nxPlanetView2D와 nxPlanetView3D에 화면 갱신을 요청한다.
        nxPlanetView2D.RefreshScreen();
        nxPlanetView3D.RefreshScreen();
    };
    Dispatcher.BeginInvoke(action);
    return default(bool);
}
3.14 솔루션을 빌드하고 실행한다.
프로그램에서 비행체를 추가한 뒤 nxPlanetView2D에서 비행체를 더블 클릭한다. 비행체가 선택되면 PlaneProperty이 생성되고 이 Window에서 CameraMode를 “Front View”를 선택하고 OK 버튼을 클릭한다.

 프로젝트 속성 설정 : XDL 시작하기 중